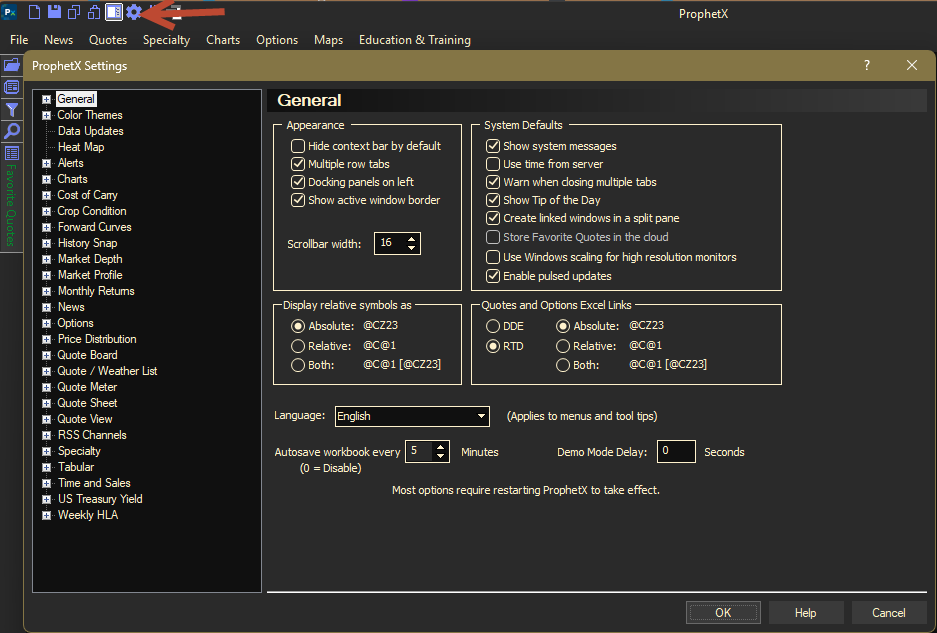
General Settings provide user-defined settings for the basic, overall structure of your ProphetX displays. Changes made in the General Settings will affect any and all displays created after a change is made. Single display changes can be made by right mouse click menus on each display.
- From the Main Menu, select the File menu, then select Settings. Alternatively, click the Settings tool
 on the Main Toolbar.
 - From the ProphetX Settings window, click on the type of display that you wish to set default settings for.

The following settings are located at the root of the General Preferences:
Appearance
- Hide context bar by default – The context bar is located at the bottom of each display and used to enhance the display. It is set off by default. It can be turned on permanently here or on each individual screen. However, it does take up screen real estate and the program will automatically display the context bar if you hover over it or press the F2 key.
- Multiple row tabs – display multiple rows of tabs with full tab names rather than a single row of tabs across the window and concatenating the tab names.
- Docking panels on left – place the Docking Panel Toolbar (pop-open) on the left side of the Main Windows instead of the default right side.
- Show Active Window Bar – shows outline of active window.
- Scrollbar width – increase and decrease the width of all the scrollbars on all displays.
System Defaults
- Show system messages – Select to show system messages when they occur
- Use time from server – Select to use time from server rather than your system clock time
- Warn when closing multiple tabs – Select to let you know there are other tabs in the window and you may be closing those as well.
- Show Tip of the Day – will show in the lower right hand corner of the screen when logging in. This is a series of tips that rotate with helpful information about ProphetX functionality.
- Create linked windows in a split screen – when adding a linked screen, the displays will show in a split screen format automatically.
- Store Favorite Quotes in the Cloud – When this is selected, the user will be able to pull their Favorite quote list into their iOS or Android ProphetX ap. The user will also need to go into the Folders and Cloud settings to setup where these files will be stored.
- Use Window scaling for high resolution monitors – turn on this setting to accommodate your higher resolution screens.
- Enable Pulsed Updates – when this is turned on, updates will blink appear to blink as they update on a quote sheet.
Display Relative Symbols as
This section defines how you want symbols to display in your ProphetX displays as well as linked spreadsheets.
- Absolute – displays the symbol in the Ticker format of symbol root, month code, and year code. Contracts will not roll when typed this way.
- Relative – displays as the alias for a rolling contract. Ex: @C@1 indicates the current corn contract that will roll to the next contract automatically when it expires.
- Both – will display both the rolling alias relative symbol as well as the absolute symbol if you entered it as an alias symbol.
Note: You must restart ProphetX for these changes to occur.
Quotes and Options Excel Links
This setting will determine how data will be linked from quotes or options into a spreadsheet. The setting is dynamic and can be interchanged with different linked data throughout your workbook The system default has been set to RTD – Real Time Data.
Language
Select between English, French, German and Spanish. This will apply to menus and tool tips.
Autosave workbook every
Sets the time interval for automatically saving your workbook while you’re working on it. For detailed information on auto saving: AutoSave
Demo Mode Delay
This specifies how many seconds to wait between tab switches when you have demo mode set up for ProphetX. Set Demo Mode Delay to x seconds. Restart ProphetX. Then press Ctrl F9 and it will start to cycle through workbook page tabs at the interval selected. To deactivate, press Ctrl F9 again. Note: ProphetX needs to be restarted to read changes to the delay time.