Select Settings on the File menu or click the Settings icon (![]() ). In the Settings display click on Alerts.
). In the Settings display click on Alerts.

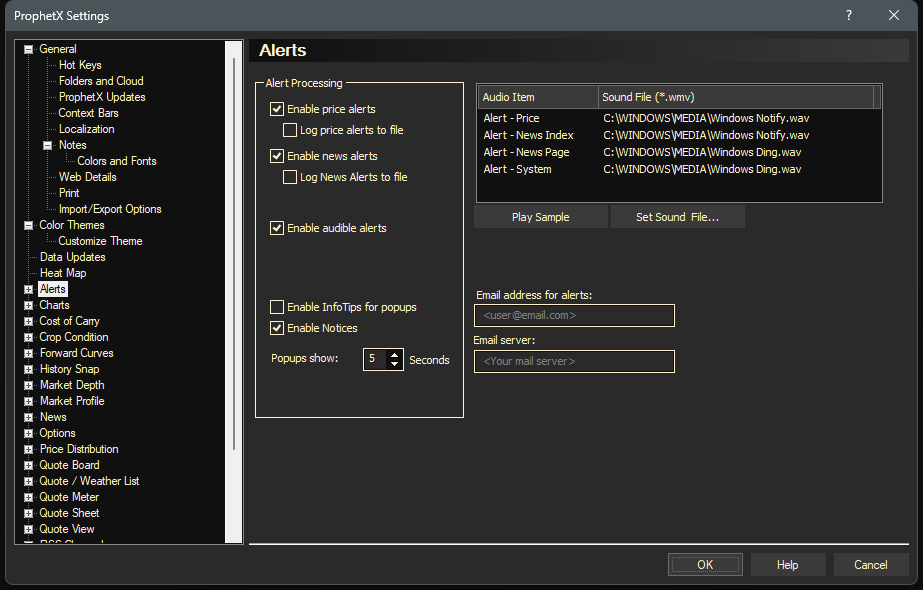
Alert Processing:
- Enable price alerts – Enable or Disable the Price Alert by checking or unchecking the box.
- Log price alerts to file – New price alerts will be listed in the Logs window, under the Price Alerts tab even if this box is not checked.
- When the box is checked, a file will be written here: (C:\Users\user.name\Documents\DTN\PRX\System\PriceAlerts.Log)
- Log price alerts to file – New price alerts will be listed in the Logs window, under the Price Alerts tab even if this box is not checked.
- Enable news alerts – Enable or Disable the News Alert by checking or unchecking the box.
-
- Log news alerts to file – New titles will be listed in the Logs window, under the News Alerts tab even if this box is not checked.
- When the box is checked, a file will be written here: (C:\Users\user.name\Documents\DTN\PRX\System\News.Log)
- Log news alerts to file – New titles will be listed in the Logs window, under the News Alerts tab even if this box is not checked.
- Enable InfoTips for pop ups – This will change the visual alert from the System Alerts log window to a pop-up that will show in the lower right hand corner of the screen.
- Enable Notices – By de-selecting this box, all pop-up information like New Information or Tips of the Day will no longer be displayed.
- Popups show: – How long a pop up window will show on your monitor when a new Alert is shown
Email Alerts
- E-mail address for alerts – Enter the e-mail address you would like the alerts to be sent to. (You can only enter 1 e-mail address here but can use a group e-mail address as well.)
- E-mail server – Enter an ISP with a standard SMTP server.
- Important Note: After setting up the preference for e-mail alerts, you must restart ProphetX in order to activate the addresses. Also, you may need to contact your e-mail administrator to make sure you’re authenticated to relay information on the e-mail server. If not authenticated on the server the e-mail will not be sent out.
Alert Field Settings
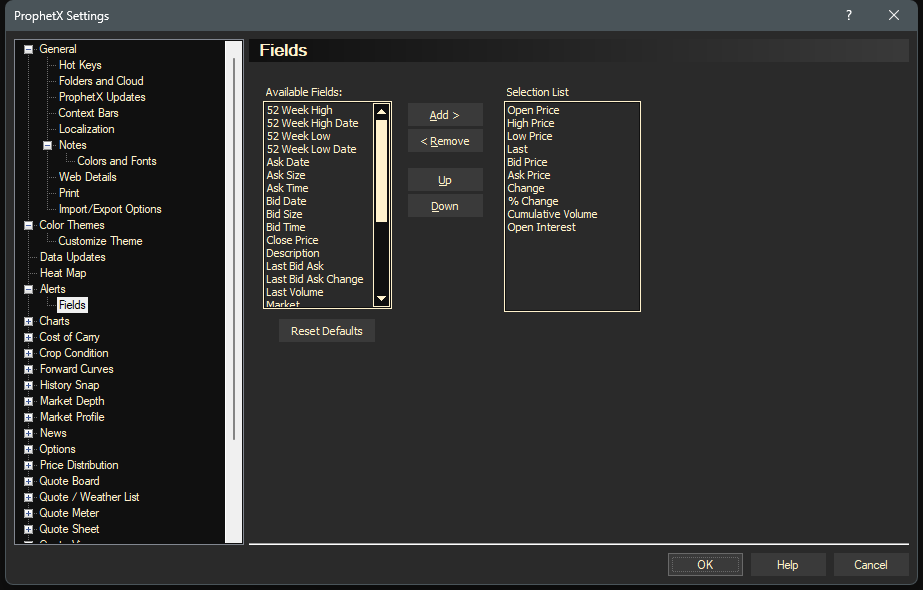
Available Fields and Selection List:
- To add a field to the Selection List highlight an Available Field name and press the Add > button.
- To remove a field from the Selection List press the < Remove button.
- Highlight a field name on the Selection List and press the Up or Down button to change the order of the Selection List display.
- Press the Reset Defaults button to return the settings to the default.
